Here i will put all the steps I have to follow to create new virtual machine using vmware and than install the Oracle software.
First you have to install and setup the vmware software. I will not describe the process here as it is not very hard to do it. I have done it on linux and on windows without problems.
So we start with creating of the new virtual machine
So we start with creating of the new virtual machine


Here you have to set the name for the virtual machine and storage where the virtual machine files will be located:

In next window you have to select which operating system you will need. I my case I have chosen Other 2.6x Linux because I will install Centos Linux on the machine

Choose the amount of RAM which will be used for your virtual machine. I have chosen 500MB.

In next window set the size of storage and location of that file which will be used by the virtual machine. I have not checked the "Allocate all disk space now" so the disk will grow as needed by the virtual machine. If you check it, it will take longer time to format create the machine because the storage will be formated and allocated.

Now set the network type you will be used. to be able to connect to internet I have chosen the NAT.

In the CD ROM settings I have chosen to use the image instead of real CD ROM.


No need of the Floppy Drive in next window

Click "Add a USB controller" on next Screen

If you dont want to add some other hardware click "Finish" on next screen

After that you new virtual machine will be created. If it was successful start it. You should see the Centos installation Welcome screen. Hit enter.

Click "Skip", if you don't want to test the installation CD.

Choose language and keyboard layout on next 2 screens


Click "Yes" to initialize the device

Choose "Create custom Layout"

Create new partitions for /boot / /oracle and swap

Edit network settings on next screen (hostname, domain, ip addresses,dhcp)

As I had only 1 CD from installation CD's I have to uncheck all packages installation during the install process. So check Customize now and then uncheck all features. Only one you should leave is the "Base" option.


After the installer will check all dependencies Centos Linux will be installed on the virtual machine. After successful installation click reboot to restart the virtual machine.

After the machine will start you will be asked to setup some parameters for it. choose the authentication and disable the SELINUX option. you can also disable the firewall configuration .


Logon to the machine as root user with password you have entered during the installation process. After logon you can get the ip address of your machine with ipconfig command. After you will have the IP you can close the vmware console and start using the putty or other preffered connection tool.
Next I have to disable the name resolving in the /etc/resolv.conf, because my logon to the machine took very long time
Next I have to disable the name resolving in the /etc/resolv.conf, because my logon to the machine took very long time

Because after the reboot the settings were change again by the OS, I have to change the attribute of the file:
chattr +i /etc/resolv.conf
As next I have changed the .bash_profile of root user. I have added the http_proxy variable to be able to update the system with the yum command when the machine is behind the proxy.
chattr +i /etc/resolv.conf
As next I have changed the .bash_profile of root user. I have added the http_proxy variable to be able to update the system with the yum command when the machine is behind the proxy.

Now update the server to have the newest kernel and newest version of all packages:
yum update
After update reboot the virtual machine so all new versions will be loaded.
Now yum can install all packages whicht are needed for the Oracle installation and which were omitted by the Linux installation:
yum groupinstall "Base"
yum groupinstall "Administration Tools"
yum groupinstall "Develpment Libraries"
yum groupinstall "Develpment Tools"
yum groupinstall "X window System
After all packages were installed reboot the machine.
Now you can set the environment variables which are needed by the Oracle.
Add these values to /etc/sysctl.conf
kernel.shmall = 2097152
kernel.shmmax = 2147483648
kernel.shmmni = 4096
kernel.sem = 250 32000 100 128
fs.file-max = 65536
net.ipv4.ip_local_port_range = 1024 65000
net.core.rmem_default = 1048576
net.core.rmem_max = 1048576
net.core.wmem_default = 262144
net.core.wmem_max = 262144
run sysctl -p
add these values to /etc/security/limits.conf
oracle soft nproc 2047
oracle hard nproc 16384
oracle soft nofile 1024
oracle hard nofile 65536
Create oracle user and appropriate grops
groupadd oinstall
groupadd dba
useradd -u 500 -g oinstall -G dba oracle
passwd oracle
Change the owner of the /oracle filesystem from root to oracle
chown -R oracle:oinstall /oracle
Now you can switch to oracle user and setup the environment variables.
su - oracle
Edit the .bash_profile and set appropriate variables
export ORACLE_BASE=/oracle
export ORACLE_HOME=$ORACLE_BASE/product/10.2.0/db_1
export ORACLE_SID=10gocm
export LD_LIBRARY_PATH=$ORACLE_HOME/lib:/lib:/usr/lib
export PATH=$PATH:$HOME/bin:$ORACLE_HOME/bin
Now enable the X-Forwarding in your connection tool and check if its working:
xclock
If you see the clocks, everything is working fine and you can continue with the installation of Oracle Software.
Download the Oralce 10g from the oracle.com and copy it to the virtual machine.
Unzip the file.
Before you start with installation, please backup the /etc/redhat-release file as the root user and than change the content of the file to redhat-4.
cp /etc/redhat-release /etc/redhat-release_old
vi /etc/redhat-release
Now run the installer:
cd database
./runinstaller
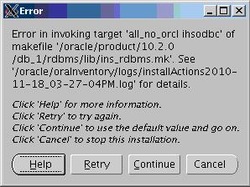
The first attempt ended with following error
yum update
After update reboot the virtual machine so all new versions will be loaded.
Now yum can install all packages whicht are needed for the Oracle installation and which were omitted by the Linux installation:
yum groupinstall "Base"
yum groupinstall "Administration Tools"
yum groupinstall "Develpment Libraries"
yum groupinstall "Develpment Tools"
yum groupinstall "X window System
After all packages were installed reboot the machine.
Now you can set the environment variables which are needed by the Oracle.
Add these values to /etc/sysctl.conf
kernel.shmall = 2097152
kernel.shmmax = 2147483648
kernel.shmmni = 4096
kernel.sem = 250 32000 100 128
fs.file-max = 65536
net.ipv4.ip_local_port_range = 1024 65000
net.core.rmem_default = 1048576
net.core.rmem_max = 1048576
net.core.wmem_default = 262144
net.core.wmem_max = 262144
run sysctl -p
add these values to /etc/security/limits.conf
oracle soft nproc 2047
oracle hard nproc 16384
oracle soft nofile 1024
oracle hard nofile 65536
Create oracle user and appropriate grops
groupadd oinstall
groupadd dba
useradd -u 500 -g oinstall -G dba oracle
passwd oracle
Change the owner of the /oracle filesystem from root to oracle
chown -R oracle:oinstall /oracle
Now you can switch to oracle user and setup the environment variables.
su - oracle
Edit the .bash_profile and set appropriate variables
export ORACLE_BASE=/oracle
export ORACLE_HOME=$ORACLE_BASE/product/10.2.0/db_1
export ORACLE_SID=10gocm
export LD_LIBRARY_PATH=$ORACLE_HOME/lib:/lib:/usr/lib
export PATH=$PATH:$HOME/bin:$ORACLE_HOME/bin
Now enable the X-Forwarding in your connection tool and check if its working:
xclock
If you see the clocks, everything is working fine and you can continue with the installation of Oracle Software.
Download the Oralce 10g from the oracle.com and copy it to the virtual machine.
Unzip the file.
Before you start with installation, please backup the /etc/redhat-release file as the root user and than change the content of the file to redhat-4.
cp /etc/redhat-release /etc/redhat-release_old
vi /etc/redhat-release
Now run the installer:
cd database
./runinstaller
The first attempt ended with following error

I have forgotten to install the libXp library. So I will install it now:
yum install libXp
Restart the installer:
./runinstaller
Now you shold see the OUI GUI.
Choose "Advanced Installation" on the first screen
yum install libXp
Restart the installer:
./runinstaller
Now you shold see the OUI GUI.
Choose "Advanced Installation" on the first screen

Specify Inventory and OS group name on next screen

Click "Custom" on next screen

Specify the ORACLE_HOME_NAME and ORACLE_HOME on this screen. If you have set the ORACLE_HOME and ORACLE_BASE in the .bash_profile, you dont need to change this values.

Check/Uncheck the components you want/dont want to install

All checks on the next screen shoudl be successful. You can manually check the Checking physical memory requirements. It will fail because according to OUI we don't have enough memory.

Leave the values on next screen as they are.

Check Install database Software only. We will create the database manually later.

Click "Install" on next screen and software installation will begin.

In the process of binary linking I have received the following error
In the log file I have found the reason:
INFO: gcc:
INFO: /usr/lib/libstdc++.so.5: No such file or directory
As this is a new version of Centos, there is no libstdc++.so.5 in the /usr/lib. As a workaround its recommended to create the link from the newer version of the library.
cd /usr/lib
ln -s libstdc++.so.6.0.8 libstdc++.so.5
After this you can hit "Retry" and the installation will continue.
Information screen to run scrips as root will be showed at the end of installation.

After you run those scripts the software was successfully installed.
Now you can patch the software to the newest version. I have used the 10.2.0.4 Patch.
Unzip the patch.
Navigate to the DISK1 directory.
Change the content of the /etc/redhat-release to Red Hat Enterprise Linux server release 5 (Tikanga)
Run installer.
./runinstaller
Click "Next" on wellcome screen
Now you can patch the software to the newest version. I have used the 10.2.0.4 Patch.
Unzip the patch.
Navigate to the DISK1 directory.
Change the content of the /etc/redhat-release to Red Hat Enterprise Linux server release 5 (Tikanga)
Run installer.
./runinstaller
Click "Next" on wellcome screen

Choose the Oracle Home which should be patched.

All checks should be successful.

Leave all values as they are on next screen

Click "Install" on next screen and installation of Patchset will begin.

After the patchset was successfully applied, click "Exit" on the information screen.

Now you have successfully created the virtual machine, installed linux operating system and also installed and patched the Oracle software. Now you can continue with the creation of the database.
